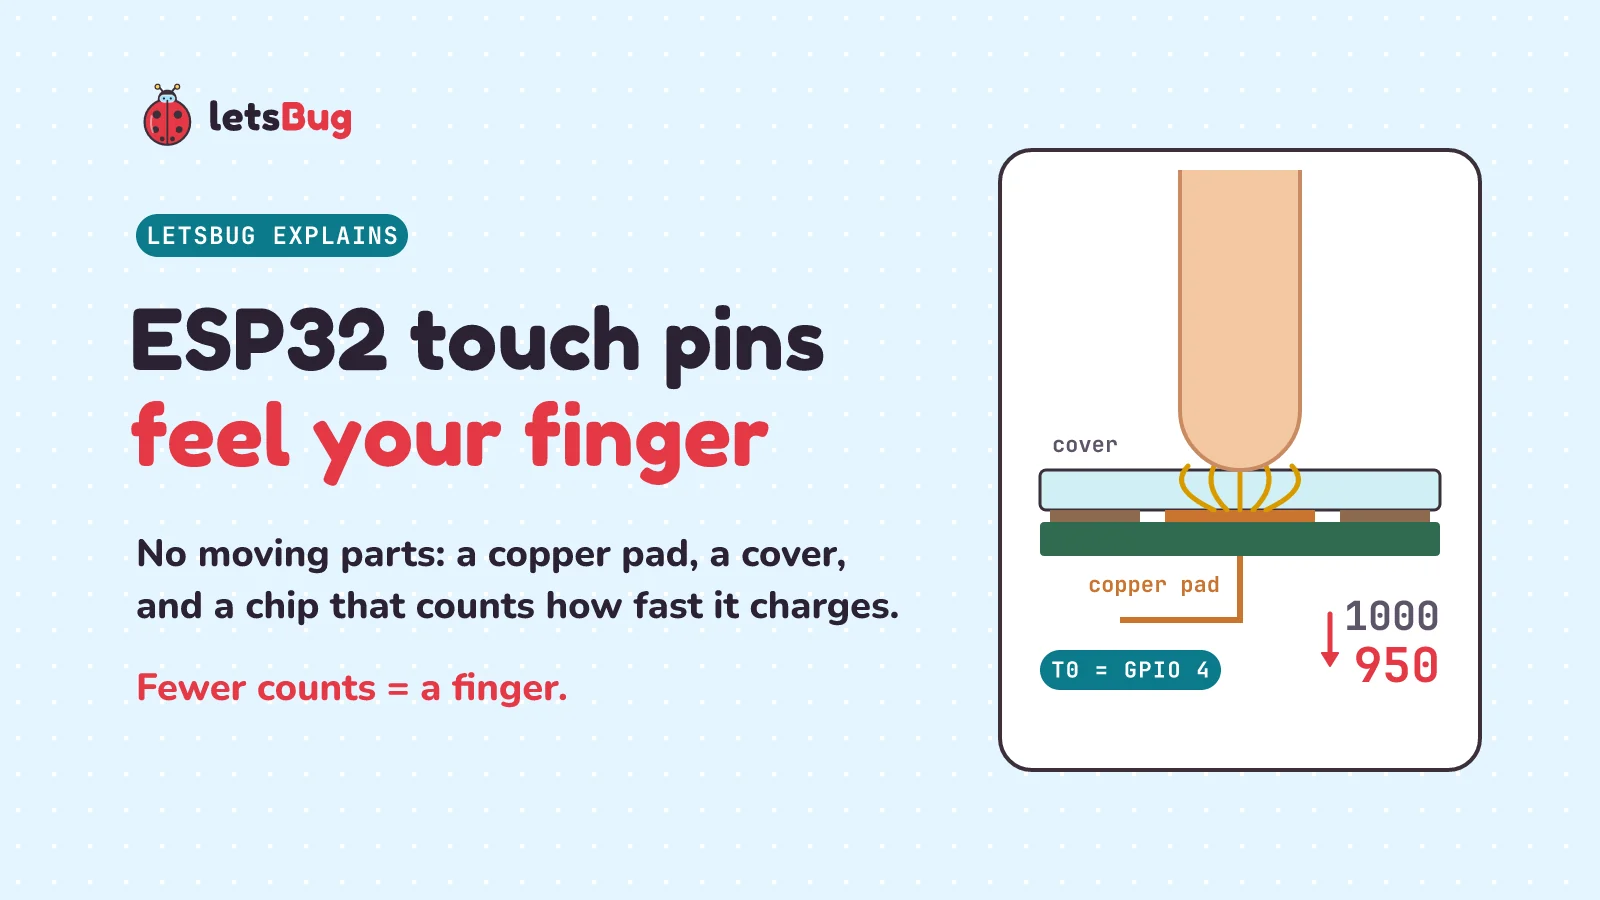
A capacitive touch sensor senses the capacitance your finger adds, not your push. A copper pad sits under a plastic or glass cover, and your fingertip adds up to a few picofarads. An ESP32 touch pin charges and empties the pad again and again, counting the cycles in a fixed time. A finger slows each charge, so the count falls.
In this post, let's look inside a touch button, follow how the ESP32 counts, map its 10 touch pins and read one with touchRead(). Then we build a touch button with a slow baseline in an Arduino sketch (Arduino's word for a program), see why an ESP32-S3 reading goes up instead of down, and work out how thick the cover can be.
Key takeaways
- A touch button is a copper pad under a plastic or glass cover, wired to a chip. Nothing moves, so nothing wears out.
- The pad and the copper ground around it form a capacitor. A fingertip adds between a few hundred femtofarads and a few picofarads.
- The ESP32 counts charge-and-discharge cycles in a fixed time. More capacitance makes each cycle slower, so the count falls when you touch.
- The ESP32 has 10 touch pins, T0 to T9. T0 is GPIO 4. Four of them (GPIO 0, 2, 12 and 15) are strapping pins, so T0 (GPIO 4) and T7 (GPIO 27) are easy first choices.
- The ESP32-S2 and ESP32-S3 measure the other way round: they time a fixed number of cycles, so their reading rises when you touch.
- The count drifts with temperature and humidity. So compare each reading with a slow baseline, and wait for a few low readings in a row.
- Thinner covers give a bigger change. Espressif recommends plastic covers of 3 mm or less and round pads 8 to 15 mm across.
This post goes with letsBug Explains, episode 8. Watch it, or read on: the post adds the ESP32's 10 touch pins, two Arduino sketches (compiled, not tested on a board), a small Python model of why the ESP32-S3 counts the other way, and practice questions with answers.
Does a button need a part that moves?
Myth or fact: a button needs a part that moves? Myth. A normal push button has a springy metal part inside that clicks down onto two contacts. After many presses, that metal wears out. Omron, a big switch maker, sells a tough small push switch called the B3F-5000. Its datasheet says: "B3F-5000/5001: 10,000,000 operations min." (Operations means presses, and min means at least.) So even this very tough switch is rated for about 10 million presses.
A touch button has nothing to wear out. You have probably used one on a cooktop, a lamp or a pair of earbuds. Espressif, the company that makes the ESP32 chip, lists the advantages in its Touch Sensor Application Note, starting with "No mechanical parts that wear out over time." Its Arduino-ESP32 guide says touch pins "can be easily integrated into capacitive pads, and replace mechanical buttons."
Our post on how touchscreens work looked at a whole grid of wires under a phone screen. This post shrinks the idea to one pad, one wire and one pin on an ESP32.
What is inside a capacitive touch button?
Under the cover sits a flat pad of copper on a circuit board, wired to a chip. That's all. No springs, no contacts. The cover is the button.
A capacitor is two conductors (materials that let charge flow, like copper) with an insulator between them. The pad is one conductor. The copper ground around it on the board is the other. The chip measures this one pad against everything around it, so it's called self-capacitance. The touch-chip maker Azoteq's design guide puts it simply: "A self-capacitive button sensor requires a single electrode to measure a change in capacitance caused by a touch." (An electrode is a conductor that carries a signal in or out. Here, it's the pad.)
Now bring a fingertip close. Your body conducts electricity a little, and it is loosely linked to the ground around you. So your finger gives the pad's electric field a second place to go, and the capacitance goes up. Espressif's application note: "When a finger touches the sensing surface, the conductive properties and mass of the body constitute a grounded conductive layer (in parallel to the touch electrode) and form a parallel plate capacitor." (Constitute means form. In parallel means side by side with the pad's own capacitance, so the two add up.) By how much? Azoteq: "This change in capacitance can range from hundreds of femtofarads to low picofarads."
Those are tiny units. Capacitance is measured in farads. A picofarad (pF) is a millionth of a millionth of a farad, and a femtofarad (fF) is a thousand times smaller still. Wikipedia's Capacitance article: "The most common units of capacitance are the microfarad (μF), nanofarad (nF), picofarad (pF), and, in microcircuits, femtofarad (fF)." (Microcircuits are the tiny circuits inside chips.)
The pad isn't the only capacitance on the pin. The wire, the pad's own capacitance to the copper ground around it, and the chip itself add some all the time. Espressif calls this the parasitic capacitance, Cp: capacitance you didn't ask for, which is there even with no finger. A touch has to stand out against it. Espressif's own example: "when a finger touch occurs, the touch capacitance Ctouch is 5 pF, the parasitic capacitance Cp is 20 pF, and the capacitance change rate is 25%. If the parasitic capacitance increases to 100 pF, then the capacitance change rate decreases to only 5%." Same finger, much smaller change. That's why Espressif's advice for Cp includes "Reduce trace length": keep the wire from the pin to the pad short.
How does an ESP32 touch pin measure your finger?
A finger adds about a picofarad. How can a chip notice something so small? It doesn't measure the capacitance directly. It measures time.
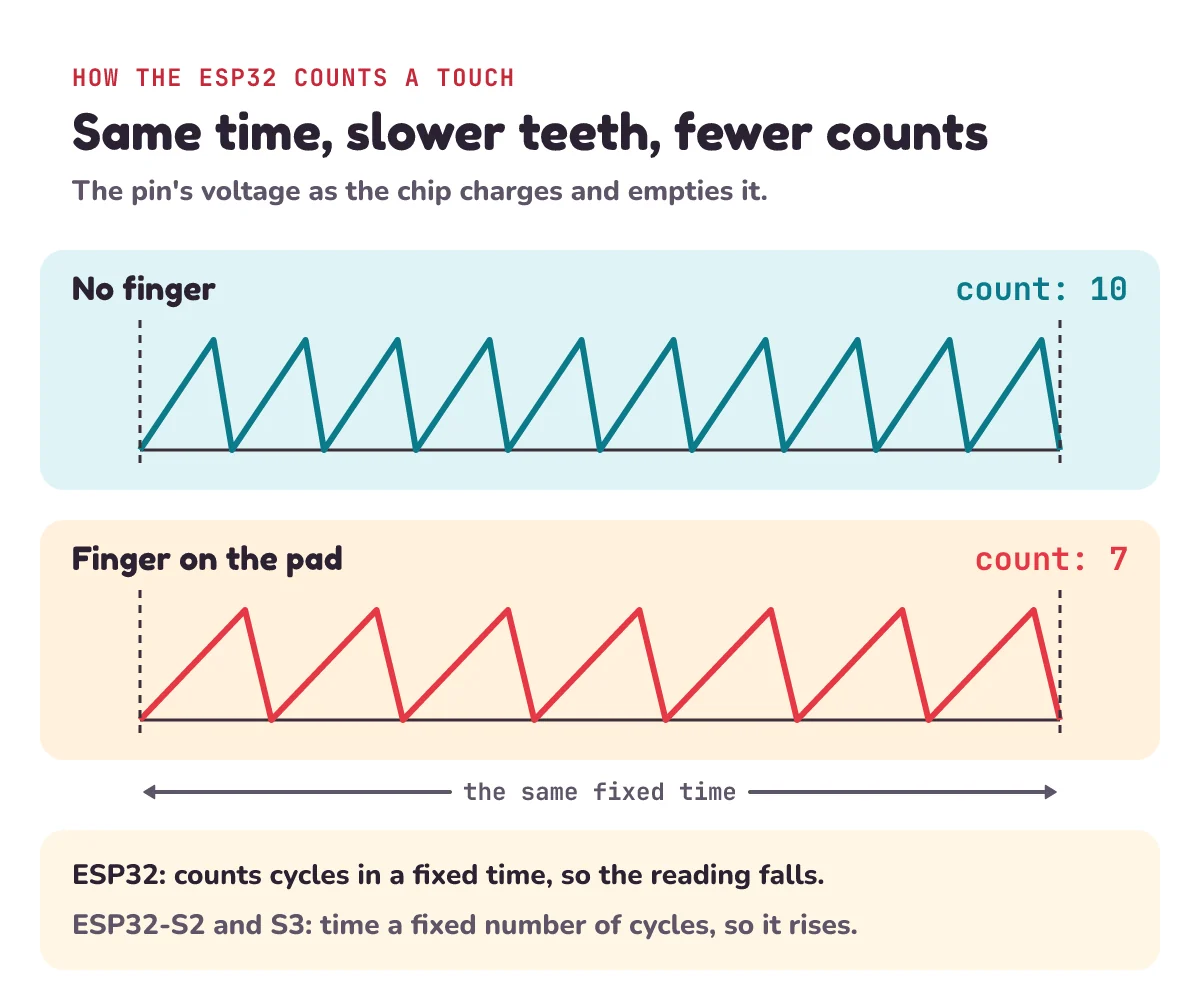
Espressif's ESP-IDF guide (the official manual for programming the chip) explains that the touch sensor charges and discharges the pin, so "the signals on the touch pins will present as a sawtooth wave." (Charging raises the pin's voltage, and discharging lets it fall again. Drawn on a graph, that up-down pattern looks like the teeth of a saw.) Then: "When the finger is approaching or touched on the touch pad, the capacitance of the touch channel increases, which leads to a slower charge and discharge, and a longer sawtooth period." (A period is the time for one full tooth. A channel is one touch input.)
And here's how it turns that into a number: "The touch sensor charges and discharges the touch channel within a fixed time and counts the number of charge-discharge cycles, and the count result serves as the raw data." Raw data means the number before any clean-up.
Think of capacitance as the size of a bucket you fill from a tap that always runs at the same speed. A bigger bucket takes longer to fill. In a fixed time, you fill it fewer times. Espressif's application note says it in one line: "The count value is inversely proportional to the total capacitance." (Inversely proportional means that if one doubles, the other halves.)
Here is that rule as a tiny Python model. The scale is made up: we pick it so that a pin with 20 pF on it reads 1,000, like the video's example. A real ESP32's numbers depend on your board, your wire and the settings. To run the code, paste each block into one file, one after another, and run it with Python 3.
def esp32_reading(c_pf):
    """ESP32: count charge-discharge cycles in a fixed time. A bigger capacitance makes each cycle slower."""
    return round(20_000 / c_pf)       # made-up scale: 1,000 counts for a pin with 20 pF on it

for c in (20, 21, 25):
    print(c, "pF ->", esp32_reading(c))
20 pF -> 1000
21 pF -> 952
25 pF -> 80020_000 is just 20000: Python lets you put _ in a number to make it easier to read. round() gives a whole number, because the chip counts whole cycles. The loop tries three capacitances.
Add Espressif's 5 pF finger to a 20 pF pin, and the reading falls from 1,000 to 800. Espressif measures how big a touch is as its sensitivity: "(non-trigger value - trigger value) / non-trigger value * 100%". (The non-trigger value is the reading with no touch, and the trigger value is the reading with a touch.) Here that's (1000 − 800) ÷ 1000 × 100 = 20%. Espressif says "the sensitivity of a highly-stable touch system should be greater than 3%."
Notice that Espressif's own example called the same finger a 25% change. That was the change in capacitance: 5 ÷ 20 = 25%. The reading changes by less, 20%, because the count goes down as the capacitance goes up: 1000 × 20 ÷ 25 = 800.
Now the video's numbers. The count fell from 1,000 to 950, a sensitivity of 50 ÷ 1000 × 100 = 5%. Because the count is inversely proportional to the capacitance, the capacitance went up by 1000 ÷ 950 ≈ 1.053 times, about 5.3%. On a 20 pF pin, that's about 1 pF more. That fits Azoteq's "hundreds of femtofarads to low picofarads".
touchRead() shows on an ESP32.Which ESP32 pins are touch pins?
Espressif's ESP32 datasheet (the chip's official fact sheet): "ESP32 has 10 capacitive-sensing GPIOs, which detect variations induced by touching or approaching the GPIOs with a finger or other objects." A GPIO (general-purpose input/output) is a pin your program can use. "Approaching" matters: a finger only has to come close.
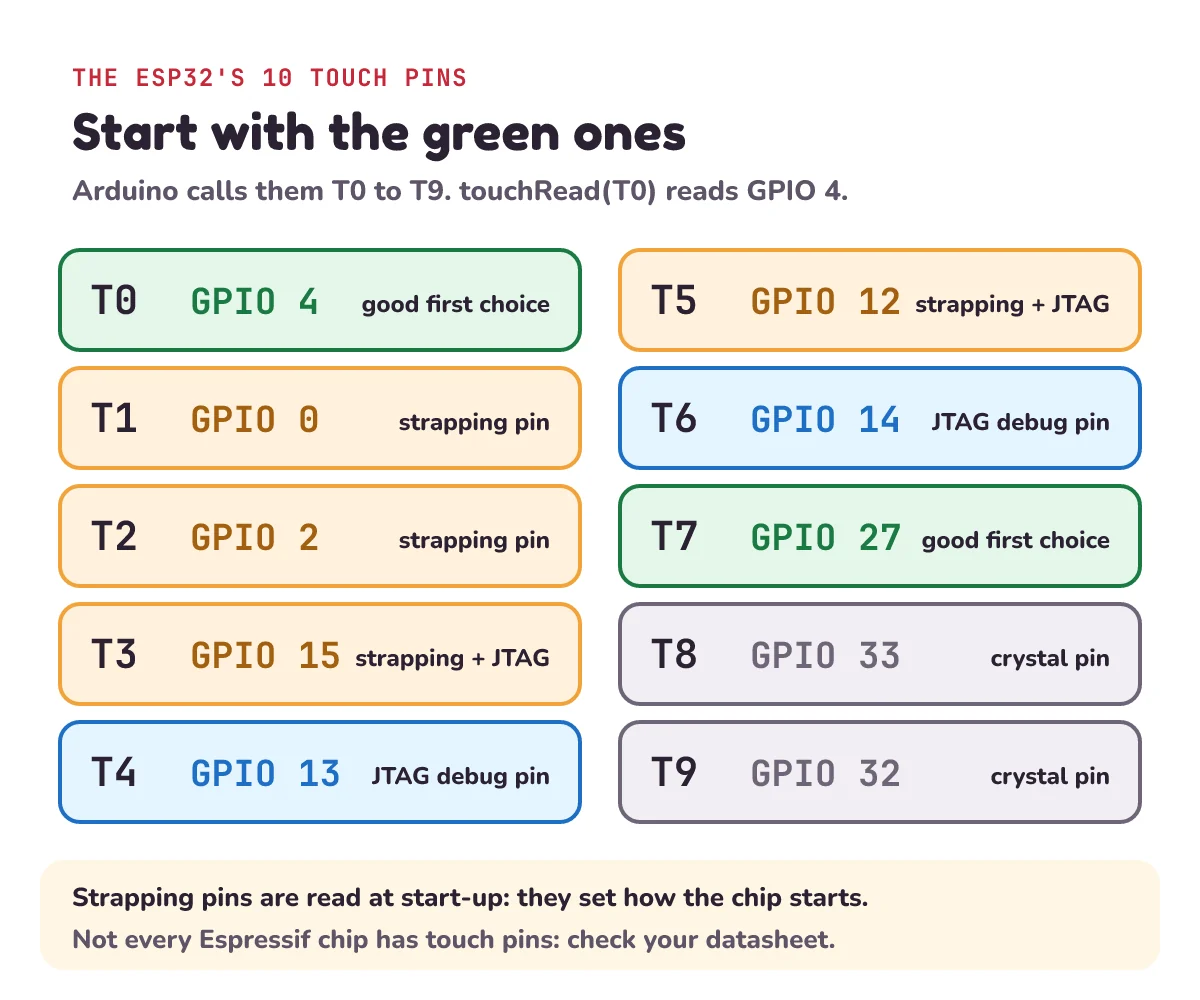
The ESP-IDF guide lists the 10 channels and their GPIOs, and the Arduino-ESP32 pin file gives them the names T0 to T9 (static const uint8_t T0 = 4; and so on). So touchRead(T0) and touchRead(4) read the same pin. Some of these pins have a second job, and the datasheet and ESP-IDF tell you which:
| Touch | GPIO | Its other job |
|---|---|---|
| T0 | 4 | None of these jobs: a good first choice |
| T1 | 0 | Strapping pin (boot mode); also the download pin |
| T2 | 2 | Strapping pin (boot mode) |
| T3 | 15 | Strapping pin; JTAG |
| T4 | 13 | JTAG |
| T5 | 12 | Strapping pin (sets an internal supply voltage); JTAG |
| T6 | 14 | JTAG |
| T7 | 27 | None of these jobs: a good first choice |
| T8 | 33 | Can connect a 32.768 kHz crystal |
| T9 | 32 | Can connect a 32.768 kHz crystal |
What do those jobs mean?
- A strapping pin is one the chip reads at the moment it starts up (boots). The datasheet says the chip sets "boot parameters through strapping pins and eFuse bits at power-up or a hardware reset". (eFuse bits are settings burned into the chip once. A hardware reset is a restart, for example from the reset button.) GPIO 0 and 2 pick the boot mode: run your program, or wait for a new one to be loaded. GPIO 12 and 15 set other start-up options, such as an internal supply voltage. Because the chip reads these pins the moment it starts, anything else wired to them can change how it starts up. So it's safest to keep your first touch pad off them.
- GPIO 0 has one more job. Espressif's application note says that "T1 (GPIO0) can function both as a touch sensor pin and a download pin." (The download pin puts the chip into the mode where it waits for a new program.)
- JTAG is a way to debug a program on the chip with a special adapter. ESP-IDF: "JTAG: GPIO12-15 are usually used for inline debug." (Inline debug means debugging the program while it runs on the chip.) If you don't use JTAG, those pins are free.
- GPIO 32 and 33 can also drive a 32.768 kHz crystal, a tiny part that keeps very steady time. The datasheet calls them 32K_XP and 32K_XN.
So, for your first touch button, use T0 (GPIO 4) or T7 (GPIO 27). They have none of the start-up, debug or crystal jobs in Espressif's lists.
Not every Espressif chip is the same. The Arduino-ESP32 guide warns: "Touch peripheral is not present in every SoC." (A peripheral is a built-in part of the chip with one job, and an SoC, a system on a chip, is the whole chip.) The ESP32-S3 has 14 touch pins, on GPIO 1 to GPIO 14. Check your chip's datasheet before you wire anything.
How do you read an ESP32 touch pin in Arduino?
If you haven't set up the Arduino software for an ESP32 yet, our ESP32 LED blink guide walks through it. Then push one end of a jumper wire (a short wire with a pin on each end) into the breadboard row next to GPIO 4 (look for a label with 4 in it), or onto the GPIO 4 pin itself if your board isn't in a breadboard. Leave the other end free. That bare end is your touch pad. Here is the whole sketch:
const int TOUCH_PIN = T0;   // T0 is GPIO 4

void setup() {
  Serial.begin(115200);
}

void loop() {
  Serial.println(touchRead(TOUCH_PIN));   // falls when a finger comes close
  delay(100);
}
Line by line:
const int TOUCH_PIN = T0;gives the pin a name.T0is GPIO 4.Serial.begin(115200);starts the link to your computer at 115,200 bits a second. Set the Serial Monitor to the same speed.touchRead(TOUCH_PIN)returns the count. The Arduino-ESP32 guide: "The TouchRead() will return the number of cycles (charges/discharges) in a certain time (meas)." On an ESP32 the number is auint16_t, a whole number from 0 to 65,535. With the default settings, one reading takes "~0.5 ms" (about half a millisecond).delay(100);waits 100 milliseconds, so you get 10 readings a second.
Open the Serial Monitor, then bring a fingertip towards the end of the wire and touch it. Watch the number fall. How far it falls depends on your wire, your board and how you touch it, so write down your own numbers: you'll need them for the next sketch.
One common surprise: touchRead() on a pin that isn't a touch pin just returns 0. In the Arduino-ESP32 source code, touchRead() first looks up the pin's touch channel, and "if (pad < 0) { return 0; }". Both the older 2.x code and the current 3.x code do this. So if you only ever see 0, check the pin number.
Both sketches in this post were compiled for the ESP32 with Wokwi's online build service on 16 November 2026, with no errors. Wokwi used an Arduino-ESP32 core based on ESP-IDF v4.4, older than the newest release; touchRead() and the name T0 are in both. The sketches were not run on a real board for this post.
Why does a fixed threshold fail, and what is a baseline?
Here's a simple idea that goes wrong. With no finger, the count is 1,000. With a finger, it's 950. So call anything below 970 a touch. When you test it at your desk, it works.
But the count also drifts. Espressif's application note: "Since the touchpad's capacitance is sensitive to external factors, such as temperature, voltage, humidity, etc., the sampled readings from the touch sensor fluctuate even when there is no touch event." (Fluctuate means go up and down. Humidity is how much water vapour is in the air.) On a damp morning, the empty pad might sit at 960. That's below 970, so the button presses itself. If the count drifts up instead, to 1,030, a real touch only takes it down to about 980, and it's never counted.
Even Wi-Fi moves the numbers. The same note says that "enabling Wi-Fi functionality will affect the stability of touch sensor reading", and that it "decreases the touch sensor's reading capability, with a maximum decrease rate of 1.2%." In other words, the readings can drop by up to 1.2%. Its advice: "please read the touch sensor after initializing the Wi-Fi functionality." So start Wi-Fi first, then take your no-touch reading.
So a touch button needs a baseline: a slow running average of the count while nobody is touching. It follows the slow drift of the weather, but not the quick drop of a finger. A touch is a big, sudden fall below the baseline, not below a fixed number. ESP-IDF calls the baseline the benchmark.
Espressif's touch software can also wait for the fall to last a few readings in a row, so that one noisy reading doesn't count. That's debouncing, the same idea as in our post on switch debouncing. Espressif's application note: "For a consecutive debounce number of scan samples, a finger touch is reported only if the difference count is greater than touch threshold + hysteresis." (Consecutive means one after another. A scan sample is one reading, and the difference count is how far the reading has moved from the baseline. Hysteresis is an extra margin, so a reading that wobbles right at the edge doesn't flip between touched and not touched.)
Here's a touch button that does all three: a slow baseline, a fall threshold and a few readings in a row. It's for the original ESP32.
const int TOUCH_PIN = T0;   // T0 is GPIO 4
const int FALL = 40;        // a touch: at least this many counts below the baseline
const int IN_A_ROW = 3;     // ...for this many readings in a row

float baseline;             // a slow running average of the untouched reading
int lowReadings = 0;        // how many readings in a row were low
bool touched = false;

void setup() {
  Serial.begin(115200);
  baseline = touchRead(TOUCH_PIN);   // keep your hand away while it starts
}

void loop() {
  int reading = touchRead(TOUCH_PIN);

  if (reading <= baseline - FALL) {
    if (lowReadings < IN_A_ROW) lowReadings++;   // low: maybe a finger
  } else {
    lowReadings = 0;
    baseline += (reading - baseline) / 128;      // not low: follow the slow drift
  }

  bool nowTouched = lowReadings >= IN_A_ROW;
  if (nowTouched != touched) {
    touched = nowTouched;
    Serial.println(touched ? "touch" : "release");
  }
  delay(20);
}
Line by line:
FALLis the threshold: how far below the baseline counts as a touch. 40 is only an example. Use about half the fall you saw with the first sketch.baselineis afloat, a number that can have a fractional part, so it can move by small steps.setup()starts it at the first reading. Keep your hand away from the pad while the board starts.- If the reading is at least
FALLbelow the baseline,lowReadingsgoes up by 1 (but never pastIN_A_ROW, so it can't grow for ever while you hold the button). - Otherwise the run of low readings starts again from 0, and the baseline moves 1/128 of the way towards the reading. That's the slow running average. It only learns from readings that aren't low, so a finger held on the pad doesn't drag the baseline down with it.
nowTouchedis true after 3 low readings in a row. The readings come about 20 ms apart, so a finger has to stay for about 40 to 60 ms.- The sketch prints only when the state changes:
"touch"when it starts and"release"when it ends.touched ? "touch" : "release"picks the first word iftouchedis true, the second if not. - To stay short, the sketch has no hysteresis: one reading back above the line releases the button. If yours flickers between touch and release, wait for a few readings back near the baseline before you release.
Pause and try this one before you read on. Yesterday the baseline was 1,000. Overnight it drifted down to 950. A touch needs a fall of 40 or more. Right now the reading is 935. Is someone touching it?
No. 950 − 935 = 15, which is less than 40. The slip is to compare with yesterday's 1,000: 1000 − 935 = 65, and you'd report a phantom press.
Why does an ESP32-S3 touch reading go up when you touch it?
If you try the first sketch on an ESP32-S3, the number goes up when you touch. That isn't a fault. The ESP-IDF guide sorts Espressif's touch sensors into versions. Version 1, the original ESP32: "the channel value decreases when it is touched". Version 2, the ESP32-S2 and ESP32-S3: "the channel value increases when it is touched".
The reason is what each one counts. The original ESP32 counts cycles in a fixed time, as we saw. The ESP32-S3's guide says: "The touch sensor counts the number of clock cycles spent for a fixed number of charge-discharge cycles, and the count result serves as the raw data." (A clock cycle is one tick of the chip's steady internal clock.) So the S3 times a fixed number of cycles instead. A finger makes each cycle slower, so the same number of cycles takes more ticks.
Think of a runner on a track. You can count how many laps they run in one minute, or time how long they take to run 10 laps. A tired runner does fewer laps in the minute, but takes longer for the 10 laps. Same runner, numbers moving in opposite directions. Add this under the first Python block:
def esp32s3_reading(c_pf):
    """ESP32-S3: count clock ticks while the pin does a fixed number of cycles."""
    return round(50 * c_pf)           # made-up scale: 1,000 ticks for a pin with 20 pF on it

for c in (20, 21, 25):
    print(c, "pF ->", esp32_reading(c), "on an ESP32,", esp32s3_reading(c), "on an ESP32-S3")
20 pF -> 1000 on an ESP32, 1000 on an ESP32-S3
21 pF -> 952 on an ESP32, 1050 on an ESP32-S3
25 pF -> 800 on an ESP32, 1250 on an ESP32-S3The ticks are in proportion to the capacitance, so 25 pF gives 50 × 25 = 1,250. Same finger, same 5 pF, opposite directions.
The Arduino-ESP32 guide follows the chips. Its touch interrupt (a function the chip calls by itself the moment something happens) "will be called if a touch sensor value falls below the given threshold for ESP32 or rises above the given threshold for ESP32-S2/S3." And touchRead() returns a uint16_t on the ESP32 but a uint32_t, a much bigger whole number, on the S2 and S3. To use the button sketch on an S2 or S3, flip the test to reading >= baseline + FALL and pick FALL from your own readings.
How thick can the cover over a touch pad be?
Think of your fingertip and the pad as the two plates of a capacitor, with the cover as the insulator between them. Wikipedia's Capacitance article: "Capacitance is proportional to the area of overlap and inversely proportional to the separation between conducting sheets." For two flat plates, that's C = εA/d:
- C is the capacitance your finger adds.
- A is the area where your finger and the pad overlap.
- d is the gap between them: the thickness of the cover.
- ε (the Greek letter epsilon) is the permittivity of the cover. It is ε0 × εr, where ε0 is a fixed number of nature, about 8.854 × 10⁻¹² farads per metre, and εr is the cover's relative permittivity.
Wikipedia defines relative permittivity as "the permittivity of a material expressed as a ratio with the electric permittivity of a vacuum." It tells you how many times more charge two plates hold for each volt with this material between them than with empty space. Air is about 1. Espressif's application note writes the same flat-plate formula for a touch pad and lists common cover materials:
| Material | εr |
|---|---|
| Air | 1.0 |
| Acrylic | 2.8 |
| Polycarbonate | 2.9 – 3.0 |
| Glass (standard) | 7.6 – 8.0 |
Let's put in numbers. Take a round pad 12 mm across (Espressif's typical size) under 1 mm of acrylic, and suppose your fingertip covers all of it. The pad's radius is 6 mm, so A = π × (0.006 m)² ≈ 0.000113 m². Then C = 8.854 × 10−12 × 2.8 × 0.000113 ÷ 0.001 ≈ 2.8 pF. That's a rough upper guess: a real fingertip doesn't press flat over the whole pad, and the field isn't really between two flat plates. But it lands in the "low picofarads" Azoteq gives.
The formula shows the two rules for a cover:
- Thinner is better. d is on the bottom, so a thicker cover gives a smaller change. Espressif: "Sensitivity is inversely proportional to the overlay thickness. Thinner overlays enhance the sensitivity." (The overlay is the cover.) It recommends: "If plastic is used, the recommended overlay thickness is 3 mm or less." Azoteq's guide says "0.8 mm to 3 mm is recommended for most typical applications".
- A higher εr is better. Glass, at about 8, lets your finger and the pad hold almost three times as much charge for each volt as acrylic, at 2.8. Espressif says "Materials with dielectric values between 2.0 and 8.0 are suitable for capacitive sensing applications." (Dielectric value is another name for relative permittivity.)
Two more rules from the same note. Glue the cover tight to the pad: "Because air has the lowest dielectric constant, any air gaps between the sensor pad and overlay must be eliminated." And no metal: "Conductive material cannot be used as an overlay because it interferes with the electric field pattern." So avoid paints with metal flakes in them, too.
What about the pad? Espressif: "The button diameter range should be between 8 mm and 15 mm. The typical value is 12 mm. A larger diameter helps with a thicker overlay." And "Two adjacent buttons should be more than 5 mm apart" (adjacent means next to each other). Azoteq notes that pads are most often "10 mm and smaller", so Espressif's 12 mm is a little bigger. Azoteq also warns: "Limit the size of the electrodes, it should not be bigger than necessary." A pad much bigger than your fingertip adds parasitic capacitance to the ground around it, but doesn't pick up any more of your finger.
Can water set off a touch button?
Yes, it can. Water usually conducts electricity a little: Azoteq's guide talks about "the liquid exhibiting electrical conductivity". So a drop on the pad can act a bit like a finger. Azoteq: "This conductive property allows the moisture or liquid to affect the capacitive sensor similar to placing a conductor on the touch sensor." That's why some touch panels misbehave when they're wet.
Designers stop this in three ways, all from Azoteq's guide:
- Mount the panel upright, "in a vertical configuration (perpendicular to the earth) to allow accumulated moisture to naturally drip off". (Perpendicular to the earth means standing up straight. Accumulated means collected.)
- Space the buttons apart: "There should be sufficient spacing between buttons".
- Add a guard electrode, an extra pad whose job is to notice large objects, like a pool of water. With it, "a liquid pool on the touch panel can be detected and the touch functionality disabled until the liquid pool is removed."
Software helps too. Espressif's application note says a good jitter filter (software that smooths out small, fast wobbles in the readings) "filters out false triggers, such as liquid droplets, inadvertent touches, etc." (Inadvertent means by accident.) The newer ESP32-S2 and ESP32-S3 go further: the ESP-IDF guide lists "waterproof" among their touch features, along with a hardware baseline and proximity sensing (noticing a hand before it touches).
Back to the myth
So a button doesn't need to move. A touch button is a copper pad under a cover. Your finger adds a little capacitance, a few picofarads at most. An ESP32 charges the pad again and again and counts: fewer counts means a finger (on an ESP32-S3, more ticks does). It compares each reading with a slow baseline, so the weather can't press the button. Thin covers and fingertip-sized pads give the biggest change.
1) On an ESP32, the baseline is 1,000 and a touch needs a fall of 40. The reading is 955. Is it a touch?
2) A touch makes the count fall from 1,200 to 1,140. What is the sensitivity, using Espressif's formula? Is it above Espressif's 3% for a highly stable system?
3) On an ESP32-S3, the untouched reading is 30,000. Which way will it move when you touch, and is 31,500 a bigger change than 3%?
4) Your button works through 1 mm of acrylic (εr = 2.8). A designer swaps it for 3 mm of standard glass (εr = 7.6). In the simple model, does the touch signal get bigger or smaller?
5) In the button sketch, you change IN_A_ROW to 5 and keep delay(20). About how long must a finger stay on the pad before the sketch prints "touch"?
Show the answers
1) Yes. 1000 − 955 = 45, which is more than 40.
2) (1200 − 1140) ÷ 1200 × 100 = 5%. Yes, that's above 3%.
3) It will go up: the ESP32-S3 counts clock ticks for a fixed number of cycles. (31500 − 30000) ÷ 30000 × 100 = 5% (the reading rises, so subtract the other way round), so yes, more than 3%.
4) Smaller. The signal goes as εr/d: acrylic gives 2.8 ÷ 1 = 2.8, and glass gives 7.6 ÷ 3 ≈ 2.53. Tripling the thickness costs more than the glass gains.
5) The 5 low readings come about 20 ms apart, so a finger has to stay for about 80 to 100 ms, around a tenth of a second.
Questions people ask
Which ESP32 pins can be used for touch?
The original ESP32 has 10 touch pins: T0 to T9, on GPIO 4, 0, 2, 15, 13, 12, 14, 27, 33 and 32. GPIO 0, 2, 12 and 15 are strapping pins that the chip reads at start-up, so T0 (GPIO 4) and T7 (GPIO 27) are the easiest to start with. The ESP32-S3 has 14 touch pins, on GPIO 1 to 14.
Why does touchRead() go down when I touch the pin?
On the original ESP32, the touch sensor counts how many charge-and-discharge cycles fit in a fixed time. Your finger adds capacitance, each cycle takes longer, so fewer fit and the number falls. On the ESP32-S2 and ESP32-S3 it rises instead, because they count clock ticks for a fixed number of cycles.
Why does touchRead() always return 0?
Usually because the pin isn't a touch pin. In the Arduino-ESP32 code, touchRead() returns 0 straight away if the pin has no touch channel. On an original ESP32, use one of T0 to T9.
Can an ESP32 touch pin wake it from deep sleep?
Yes. ESP-IDF says "The ESP32 supports waking-up the chip from light sleep or deep sleep with the touch sensor as a wake-up source." In Arduino, touchSleepWakeUpEnable(pin, threshold) sets a touch pin up as the wake-up source. ESP-IDF warns that the chip "will continue to sample the touch channels after sleep, which will increase the power consumption during the sleep."
Does Wi-Fi affect ESP32 touch readings?
A little. Espressif's application note says Wi-Fi makes the readings less steady and can lower them by up to 1.2%. Start Wi-Fi first, then take the no-touch reading you set your threshold from, and keep a slow baseline running.
Can I use an ESP32 touch pin in a product?
For hobby projects, yes. For a product, read the datasheet's note first. The ESP32 datasheet says its touch sensor "has not passed the Conducted Susceptibility (CS) test for now, and thus has limited application scenarios." That test checks how well a device copes with electrical noise arriving along its cables.
Keep going
- Watch the full lesson, How Does a Capacitive Touch Sensor Work? ESP32 Touch Pins, Explained, and its Short, A Button With No Moving Parts: How Does It Know You Touched It? Then see the rest of letsBug Explains on YouTube.
- The episode before this one: how do touchscreens work? (a whole grid of these capacitors, and why gloves fail).
- Counting a press only once: switch debouncing explained.
- Your first ESP32 project, from installing the software to uploading: ESP32 LED blink.
- The next episode: how OTPs and authenticator apps work.
Checked on 16 November 2026 against the 13 sources below.
Sources
- Espressif, ESP-IDF Programming Guide: Capacitive Touch Sensor (ESP32) (the sawtooth; counting cycles in a fixed time; the 10 channels and their GPIOs; version 1 falls and version 2 rises; the benchmark; debounce; sleep wake-up)
- Espressif, ESP-IDF Programming Guide: Capacitive Touch Sensor (ESP32-S3) (counting clock cycles for a fixed number of charge-discharge cycles; 14 touch pins on GPIO 1 to 14)
- Espressif, Arduino-ESP32 documentation: TOUCH (what touchRead() returns; uint16_t and uint32_t; about 0.5 ms a reading; interrupt direction on ESP32 and ESP32-S2/S3; not every chip has touch; deep sleep wake-up)
- Espressif, arduino-esp32: variants/esp32/pins_arduino.h (T0 = 4 to T9 = 32)
- Espressif, arduino-esp32: cores/esp32/esp32-hal-touch-ng.c (touchRead() returns 0 for a pin with no touch channel, in the current 3.x code)
- Espressif, arduino-esp32 2.0.17: cores/esp32/esp32-hal-touch.c (the same check in the older 2.x code)
- Espressif, ESP32 Series Datasheet v5.3 (10 capacitive-sensing GPIOs; the touch pin table; strapping pins; the 32.768 kHz crystal pins; the CS test note)
- Espressif, ESP-IDF Programming Guide: GPIO & RTC GPIO (ESP32) (GPIO 12 to 15 and JTAG)
- Espressif, Touch Sensor Application Note (no parts that wear out; parasitic capacitance and the 5 pF / 20 pF example; count inversely proportional to capacitance; sensitivity and the 3% guide; debounce; cover materials and thickness; button size and spacing; GPIO 0 as the download pin; drift; Wi-Fi; liquid droplets)
- Azoteq, AZD125 Capacitive Sensing Design Guide v1.2, 2025 (self-capacitance; hundreds of femtofarads to low picofarads; 0.8 to 3 mm covers; pad size; water and the three design fixes)
- Omron: B3F tactile switch datasheet (B3F-5000: 10,000,000 operations minimum)
- Wikipedia: Capacitance (area and separation; ε0; pF and fF)
- Wikipedia: Relative permittivity (a ratio with the permittivity of a vacuum)
Both Python code samples in this post were run in Python 3.13 before publishing. Both Arduino sketches were compiled for the ESP32 with Wokwi's online build service, not run on a board.